


How to Tile a Kitchen Backsplash (The Complete Guide)

A kitchen backsplash may be one of the smallest surfaces in your home, but it has an outsized impact on both style and functionality. Knowing how to tile a kitchen backsplash properly can elevate your kitchen from ordinary to polished while protecting walls from moisture, grease, and everyday messes.
Whether you’re tackling a DIY renovation or planning with a contractor, this complete guide walks you through every step of the process, from preparation and layout to tile selection, installation, and long-term care.
Beyond technique, we’ll also explore five standout porcelain tile options that are particularly well-suited for backsplash applications, each offering unique visual appeal and practical benefits.
Step-By-Step: How To Tile A Kitchen Backsplash
-
Dry Lay Tiles
Arrange tiles on the countertop to visualize layout and minimize awkward cuts. -
Apply Adhesive
Use a notched trowel to spread thinset evenly on small sections of wall. -
Set Tiles
Press tiles firmly into place, using spacers to maintain even grout lines. -
Cut As Needed
Cut tiles carefully around outlets, corners, and edges. -
Allow To Cure
Let adhesive set for at least 24 hours before grouting. -
Apply Grout
Work grout into joints using a rubber float, wiping excess with a damp sponge. -
Seal Grout
Once cured, seal grout to protect against stains and moisture.
Mastering how to tile a kitchen backsplash comes down to patience, preparation, and attention to detail.
Maintaining Your Tile Backsplash
Routine maintenance keeps your backsplash looking new. Wipe surfaces regularly with mild cleaners and avoid abrasive tools. Reseal grout periodically to prevent discoloration. Promptly clean cooking splashes to preserve tile finishes.
Why Tile Is The Best Choice For Kitchen Backsplashes
Tile has long been the gold standard for kitchen backsplashes, and for good reason. Kitchens are high-traffic spaces exposed to heat, humidity, splashes, and stains. Tile provides a durable, easy-to-clean surface that protects walls while adding character.
Understanding how to tile a kitchen backsplash allows homeowners to personalize their space with color, pattern, and texture. Porcelain tiles, in particular, are resistant to moisture, staining, and heat, making them ideal for areas behind sinks and stovetops. Unlike paint or wallpaper, tile holds up under repeated cleaning and maintains its appearance for years.
Tile backsplashes also increase home value. A well-installed backsplash gives kitchens a finished, custom look that appeals to buyers and enhances overall design cohesion.
Planning Your Kitchen Backsplash Project
Before learning how to tile a kitchen backsplash, careful planning is essential. Start by measuring the total backsplash area, including sections behind the sink, stove, and countertops. Always add 10–15 percent extra tile to account for cuts, waste, and future repairs.
Next, determine your layout. Decide whether tiles will be stacked, staggered, herringbone, or vertically aligned. The pattern you choose can dramatically affect how the space feels. Small kitchens often benefit from vertical or light-colored tile layouts, while bold patterns can anchor larger kitchens.
Grout selection is another crucial planning step. Matching grout creates a seamless appearance, while contrasting grout highlights tile shapes and patterns. Consider stain resistance and maintenance when choosing grout color.
Tools And Materials You’ll Need
To properly understand how to tile a kitchen backsplash, having the right tools is just as important as choosing the right tile.
Essential tools include:
-
Tile cutter or wet saw
-
Notched trowel
-
Tile spacers
-
Level
-
Rubber grout float
-
Sponge and bucket
-
Measuring tape
-
Painter’s tape
-
Thinset or tile adhesive
Gathering everything beforehand ensures a smoother installation process and reduces unnecessary interruptions.
Preparing The Wall Surface
Surface preparation is one of the most overlooked steps when learning how to tile a kitchen backsplash. Walls must be clean, dry, flat, and free of grease or debris. Remove outlet covers and switch plates, then lightly sand glossy paint so adhesive bonds properly.
If the wall has imperfections, fill them with spackling compound and sand smooth. For areas exposed to heavy moisture, consider applying a primer or waterproofing membrane for added protection.
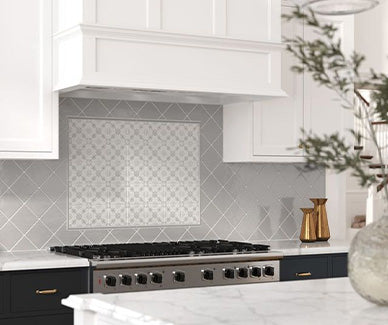
Beautiful Kitchen Backsplash Tile from AquaBlu Mosaics
Studio Terrazzo Nero 8x8 Porcelain Tile

Studio Terrazzo Nero 8x8 porcelain tile offers a bold yet timeless aesthetic that works beautifully in modern and transitional kitchens. Its terrazzo-inspired surface blends small fragments of lighter tones against a dark base, creating depth without overwhelming the space.
One of the major benefits of this tile is versatility. When learning how to tile a kitchen backsplash, square tiles like this are easy to align and ideal for grid or offset layouts. The 8x8 size provides enough visual impact to serve as a focal point while still maintaining balance with cabinetry and countertops.
Studio Terrazzo Nero pairs especially well with white or light wood cabinets, brushed metal hardware, and minimalist countertops. Its porcelain construction ensures durability, stain resistance, and easy cleaning, making it perfect for busy kitchens. This tile works equally well behind stovetops or full-height backsplashes, adding a sophisticated edge without feeling trendy or temporary.
Milano Scala Bosco 4.5x9 Porcelain Tile

Milano Scala Bosco 4.5x9 porcelain tile brings warmth and movement to kitchen backsplashes. Its elongated shape is ideal for stacked, vertical, or brick-style layouts, allowing homeowners to customize the look while mastering how to tile a kitchen backsplash with visual interest.
This tile’s earthy tones create a welcoming atmosphere, making it especially well-suited for kitchens with natural materials like wood beams, butcher block counters, or stone accents. Its size helps elongate walls visually, which can make smaller kitchens feel more open and airy.
Porcelain durability ensures resistance to moisture, heat, and everyday wear. Milano Scala Bosco is easy to maintain and holds up well in high-use cooking areas. Whether used as a full backsplash or accent wall, it delivers both charm and practicality.
Granadella Esmeralda 4.5x4.5 Porcelain Tile

Granadella Esmeralda 4.5x4.5 porcelain tile is ideal for homeowners looking to inject color and personality into their kitchen. The rich green tones evoke a handcrafted, artisan feel that adds depth and dimension to backsplash installations.
When learning how to tile a kitchen backsplash using smaller tiles, precision and layout planning become even more important. This tile excels in grid patterns and decorative layouts that highlight its vibrant glaze variation.
Granadella Esmeralda works beautifully with neutral cabinets, brass fixtures, and open shelving. Its porcelain composition ensures long-term durability, while its glossy finish reflects light, helping kitchens feel brighter and more dynamic. This tile is especially effective for statement backsplashes or feature walls behind ranges.
Stripes Mix Glacier 10x10 Porcelain Tile

Stripes Mix Glacier 10x10 porcelain tile offers a contemporary design with subtle patterning that brings texture without overwhelming the space. The larger format reduces grout lines, making installation simpler for those learning how to tile a kitchen backsplash for the first time.
This tile is an excellent choice for modern kitchens that favor clean lines and understated elegance. Its cool tones complement stainless steel appliances, quartz countertops, and flat-panel cabinetry.
The porcelain surface is resistant to staining and splashes, making routine cleanup effortless. Stripes Mix Glacier is particularly effective for full-height backsplashes, where its pattern can be fully appreciated without visual clutter.
Granadella Sal 2.5x9 Porcelain Tile

Granadella Sal 2.5x9 porcelain tile delivers a refined, handcrafted look with a slimmer profile that works well in vertical or herringbone layouts. Its proportions are ideal for adding movement while maintaining a cohesive design.
Understanding how to tile a kitchen backsplash with narrow tiles like this involves careful spacing and alignment, but the result is worth the effort. The tile’s subtle texture and color variation add warmth without dominating the space.
Granadella Sal pairs beautifully with natural stone countertops, shaker cabinets, and mixed metal finishes. Its porcelain durability ensures it performs well behind sinks and cooktops while remaining easy to maintain.
FAQ: How to Tile a Kitchen Backsplash
How long does it take to tile a kitchen backsplash?
Most installations take one to two days, including curing time.
Can beginners learn how to tile a kitchen backsplash successfully?
Yes, with proper planning, tools, and patience, many homeowners complete backsplash projects successfully.
Do porcelain tiles need sealing?
Porcelain tiles do not require sealing, but grout typically does.
What grout color should I choose?
Matching grout offers a seamless look, while contrasting grout highlights tile patterns.
Can I tile over existing backsplash tile?
In some cases, yes, but surfaces must be clean, stable, and properly prepared.