


How to Grout a Kitchen Backsplash (Professional Guide)


Grouting a kitchen backsplash is one of the most important steps in creating a polished, long lasting tile installation. While many homeowners are tempted to treat it as a simple DIY task, understanding how to grout a kitchen backsplash properly requires precision, product knowledge, and safety awareness.
Grout protects tile edges, seals gaps from moisture, and gives your backsplash its finished appearance. Improper grouting can lead to cracking, staining, and even water damage behind your walls.
This professional guide explains how to grout a kitchen backsplash correctly and why working with a licensed contractor is often the safest and smartest choice.
*Remember to always first consult a professional contractor before starting any major kitchen updates.
Why Professional Installation Matters
Learning how to grout a kitchen backsplash is not only about appearance but also about durability and hygiene. Kitchen backsplashes are constantly exposed to moisture, heat, grease, and food particles. If grout lines are uneven or poorly sealed, bacteria and mold can form over time.
Professional contractors understand surface preparation, spacing, and curing times. They use the correct grout type based on your tile material and kitchen conditions. A professional also ensures proper ventilation and safety when working with grout chemicals and sealers. This reduces the risk of skin irritation, inhalation hazards, and costly mistakes.
When considering how to grout a kitchen backsplash, hiring a professional protects both your investment and your health.
Step One: Surface Preparation
Before grouting begins, tiles must be fully set and adhesive completely cured. Professionals clean the tile surface to remove dust and debris. Spacers are removed, and grout lines are checked for uniform depth.
Preparation is critical when learning how to grout a kitchen backsplash correctly. Any leftover adhesive in grout joints can cause uneven color and weak bonding.
Step Two: Choosing The Right Grout
Not all grout is the same. Sanded grout is typically used for wider joints, while unsanded grout works best for narrow lines often found in backsplashes. Epoxy grout may be used for kitchens because of its stain resistance and durability.
A contractor will help select the best grout color and type to complement your tile design and resist moisture and stains.
Step Three: Applying The Grout
Grout is mixed to the correct consistency and applied with a rubber float at a diagonal angle across tile joints. This ensures full coverage and prevents gaps. Excess grout is removed from the tile surface before it hardens.
Understanding how to grout a kitchen backsplash includes knowing proper timing. Professionals monitor drying time carefully to prevent cracking or uneven texture.
Featured Kitchen Backsplash Tiles:
➡️ Milano Scala Bosco 4.5 x 9 Porcelain Tile

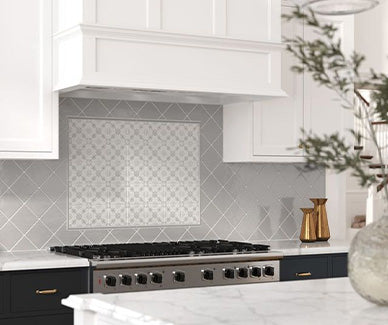
Milano Scala Bosco porcelain tile brings warmth and sophistication to any kitchen backsplash design. Its elongated shape creates a modern subway style layout while still offering natural earth tones that complement both contemporary and traditional kitchens. The surface features subtle texture and depth, which makes grout lines visually important for defining the pattern.
When considering how to grout a kitchen backsplash using Milano Scala Bosco, grout color selection becomes a design tool. Light grout creates contrast and highlights each tile shape, while darker grout produces a seamless and cozy appearance. This tile pairs beautifully with neutral or warm grout tones that enhance its organic character.
Milano Scala Bosco is highly durable and resistant to moisture, making it ideal for kitchen environments. A professional installer will ensure the grout fills joints evenly to avoid trapping grease or food particles. Proper sealing after installation protects the tile and grout from staining and keeps the backsplash looking clean for years.
This tile is perfect for homeowners who want a backsplash that blends modern lines with natural style while benefiting from professional level grouting techniques.
➡️ Stripes Mix Glacier 10 x 10 Porcelain Tile

Stripes Mix Glacier porcelain tile offers a bold and artistic backsplash option with a blend of light and cool tones. Its patterned design creates visual movement across kitchen walls, making grout lines an essential part of the final look. Learning how to grout a kitchen backsplash with patterned tile like this requires extra care to avoid distracting from the design.
Professional contractors typically recommend a neutral grout color that complements the tile pattern without overpowering it. This allows the stripes to remain the focal point while maintaining clean and consistent grout joints.
The porcelain construction makes Stripes Mix Glacier highly resistant to heat and moisture, ideal for kitchens near cooktops and sinks. Proper grout application ensures the pattern remains crisp and prevents discoloration over time.
This tile is especially effective in contemporary kitchens where visual texture and contrast are desired. With expert grouting and sealing, it delivers both style and performance while keeping maintenance simple.
➡️ Marrakech Sea Water 4 x 4 Porcelain Tile

Marrakech Sea Water porcelain tile brings vibrant color and handcrafted charm to kitchen backsplashes. Its square shape and rich glaze create a striking focal point that benefits from precise grout application. Knowing how to grout a kitchen backsplash with colorful tile requires careful attention to color harmony and spacing.
Professionals often suggest grout shades that balance the tile’s bold hue while maintaining visual clarity between tiles. A poorly chosen grout color can overpower the tile’s natural beauty, while a well selected grout enhances its character.
Marrakech Sea Water is ideal for Mediterranean and coastal inspired kitchens. Its porcelain body ensures durability, but grout quality plays a critical role in preserving the overall look. Proper sealing prevents moisture absorption and staining from cooking oils or sauces.
This tile transforms kitchen walls into a design statement and works best when installed and grouted by experienced professionals who understand pattern alignment and finish consistency.
Final Thoughts: How to Grout a Kitchen Backsplash
Understanding how to grout a kitchen backsplash is about more than applying grout. It involves preparation, product selection, safety, and expert finishing techniques. While homeowners can attempt DIY projects, professional contractors provide better results, reduce risks, and protect your investment.
A professionally grouted backsplash improves hygiene, durability, and overall kitchen appearance.
FAQ: How to Grout a Kitchen Backsplash
Why should I hire a professional instead of doing it myself?
Professionals ensure proper grout mixing, application, sealing, and safety practices, reducing the risk of cracks and moisture damage.
How long does grout take to cure on a kitchen backsplash?
Most grout cures within 24 to 48 hours, but full sealing may take several days depending on product type.
Can I change grout color later?
Yes, grout can be stained or replaced, but it requires professional tools and experience.
Is epoxy grout better for kitchens?
Epoxy grout is highly stain resistant and durable, making it a popular choice for kitchen backsplashes.
How often should grout be sealed?
Cementitious grout should be sealed every one to two years depending on usage and cleaning frequency. Epoxy grout does not require sealing.